Understanding ISO: Shedding Light on Light Sensitivity
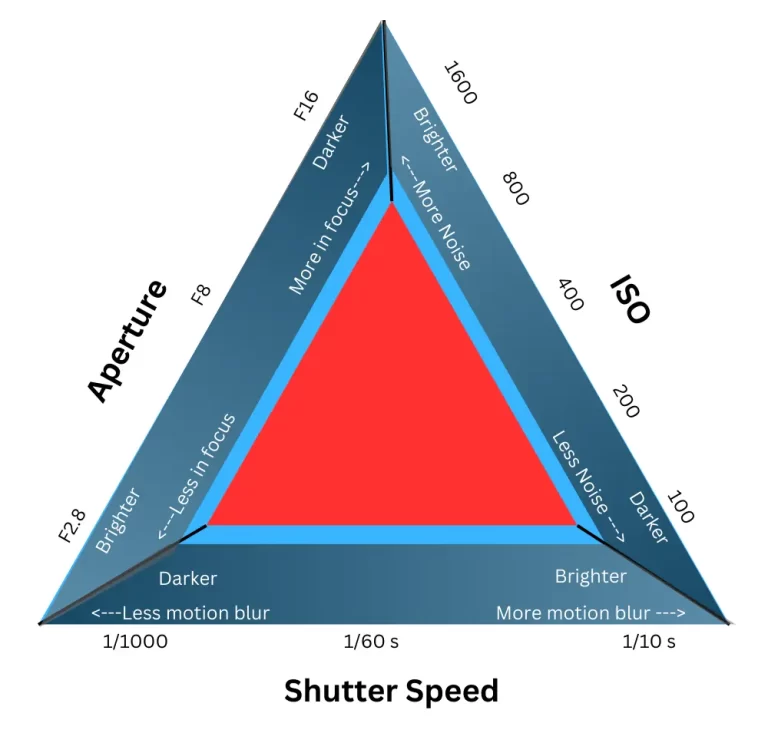
ISO is derived from the International Organization for Standardization and defines the sensitivity of your camera’s sensor to light. Understanding ISO is an aspect of photography that directly influences the exposure of your images. Put simply, ISO determines how bright or dark your photos will be, allowing you to adapt to various lighting conditions with ease. Like a dimmer switch controls the brightness of a room, ISO serves as the “dimmer switch” for your camera. Enabling you to adjust the sensitivity of the sensor to incoming light. This flexibility is invaluable, as it rounds out the three primary components of the exposure triangle. Allowing photographers to choose the shutter speed and aperture needed for the scene, and then compensating with ISO.
What Does ISO Do in Photography?
ISO plays a pivotal role in the exposure triangle alongside aperture and shutter speed. While aperture regulates the amount of light entering the camera and shutter speed controls the duration of exposure, ISO complements these settings by adjusting the sensor’s sensitivity to light. As you increase the ISO, the sensor becomes more receptive to light, enabling you to capture well-exposed images in low-light environments where a longer exposure or wider aperture may not suffice. Conversely, lowering the ISO reduces sensitivity, ideal for bright, sunlit scenes where preserving image quality and minimizing noise are paramount. By mastering the interplay between ISO, aperture, and shutter speed, photographers can achieve precise control over exposure, unlocking endless creative possibilities and ensuring consistently stunning results.
How to Use ISO for Better Images: Practical Tips for Beginners
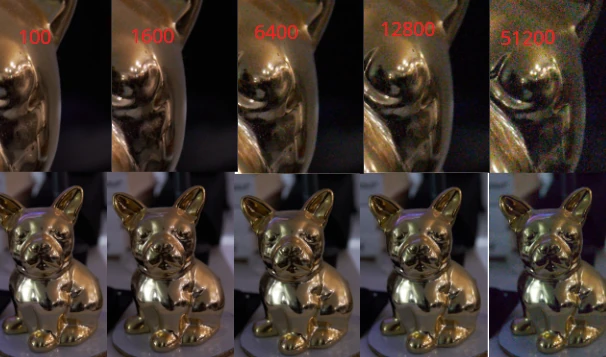
1. Start with the Basics: Familiarize Yourself with ISO Settings
Begin your journey by acquainting yourself with your camera’s ISO settings. Most cameras offer a range of ISO options, typically starting from around ISO 100 or 200 and extending to higher values like 6400 or beyond. Understanding these settings empowers you to make informed decisions based on the prevailing lighting conditions and desired aesthetic. Take the time to explore the ISO settings menu on your camera and familiarize yourself with the options available. Experiment with different ISO values in various shooting scenarios to develop a deeper understanding of how they impact the exposure and overall look of your images.
2. Embrace Manual Mode: Take Control of Your Exposure
While automatic shooting modes offer convenience, venturing into manual mode grants you full control over ISO, aperture, and shutter speed. This level of control is invaluable for photographers seeking to fine-tune their exposure settings and achieve the desired creative vision. Experimentation is key to mastering exposure settings, so don’t hesitate to explore different combinations to achieve the desired effect. As you become more comfortable with manual mode, you’ll gain a deeper understanding of how ISO interacts with aperture and shutter speed to influence the exposure of your images.
3. Consider the Lighting Conditions: Adapt Your ISO Accordingly
When venturing into the field, pay close attention to the prevailing lighting conditions. In low-light environments or during the golden hour, increasing the ISO allows you to maintain proper exposure without sacrificing image quality. This is particularly useful when shooting handheld or capturing fast-moving subjects. Conversely, in bright daylight or well-lit scenes, opt for lower ISO settings to minimize noise, and preserve detail. By adapting your ISO to suit the specific lighting conditions, you can ensure optimal exposure and image quality in every situation.
4. Strike a Balance: Minimize Noise for Crisp, Clear Images
While higher ISO settings enable shooting in challenging lighting conditions, they also introduce digital noise, resulting in a grainy texture. To strike a balance between sensitivity and image quality, aim to use the lowest ISO setting that allows you to achieve the desired exposure. Additionally, leverage noise reduction techniques in post-processing to refine your images and ensure optimal clarity. Experiment with different ISO values and noise reduction settings to find the right balance for your unique shooting style, camera and preferences. With practice and experimentation, you’ll develop a keen eye for when to adjust ISO to achieve the best possible results in any lighting situation. It is easier to salvage a noisy image than one that is out of focus or subject to motion blur.
5. Experiment and Learn: Develop Your Photographic Eye
As with any aspect of photography, practice is paramount to mastering ISO. Take the time to experiment with different ISO settings in diverse shooting scenarios. Observing how they influence the overall look and feel of your images. Set aside dedicated time to explore various lighting conditions, subjects, and environments. Don’t be afraid to push the boundaries of your creativity. By actively engaging with your camera and experimenting with ISO, you’ll develop a deeper understanding of its nuances and how it interacts with other exposure parameters. As you gain confidence in your abilities, challenge yourself to step outside your comfort zone and push the limits of what’s possible with your camera.
Conclusion: Leveraging ISO to Capture Stunning Images
In conclusion, ISO in photography serves as a cornerstone in achieving well-exposed and visually compelling images. By understanding its role in the exposure triangle and implementing practical strategies for its use, beginners can harness the power of ISO to overcome challenging lighting conditions and unlock their creative potential.
As you continue to explore the world of photography, remember that mastering ISO is not an endpoint but rather a journey of continual learning and experimentation. Embrace the nuances of ISO, venture forth with confidence, and embark on a journey of discovery as you capture captivating moments through the lens and tune them in the digital darkroom.
With dedication, practice, and a keen eye for detail, you’ll soon master the balancing act of photography to create the images in your mind. So, don’t be afraid to push the boundaries of your creativity, explore different ISO settings, and immerse yourself in the endless possibilities that await you in the fascinating world of photography.